Come here often and see all the crazy things that I have been upto!

Archive for the ‘Technology’ Category

Doing It Better #6: Challenges To Be Expected / Persistence Towards Vision

Hardware

To be forewarned is to be forearmed. The first goal of this project is to effectively repurpose old laptop hardware into a digital picture frame, and improve on the quality of conventional frames. This project requires very tight cooperation between hardware and software, both being used in ways which they were not intended to.

Coming up are lists of anticipated challenges in both categories, which will have to be overcome in the final design. Although I do not mean these to be anywhere near comprehensive, they ought to serve as a guide in the design phase.

Frame Options

The following is a broad overview of the thought process employed in choosing a frame design and integrating the hardware into it.

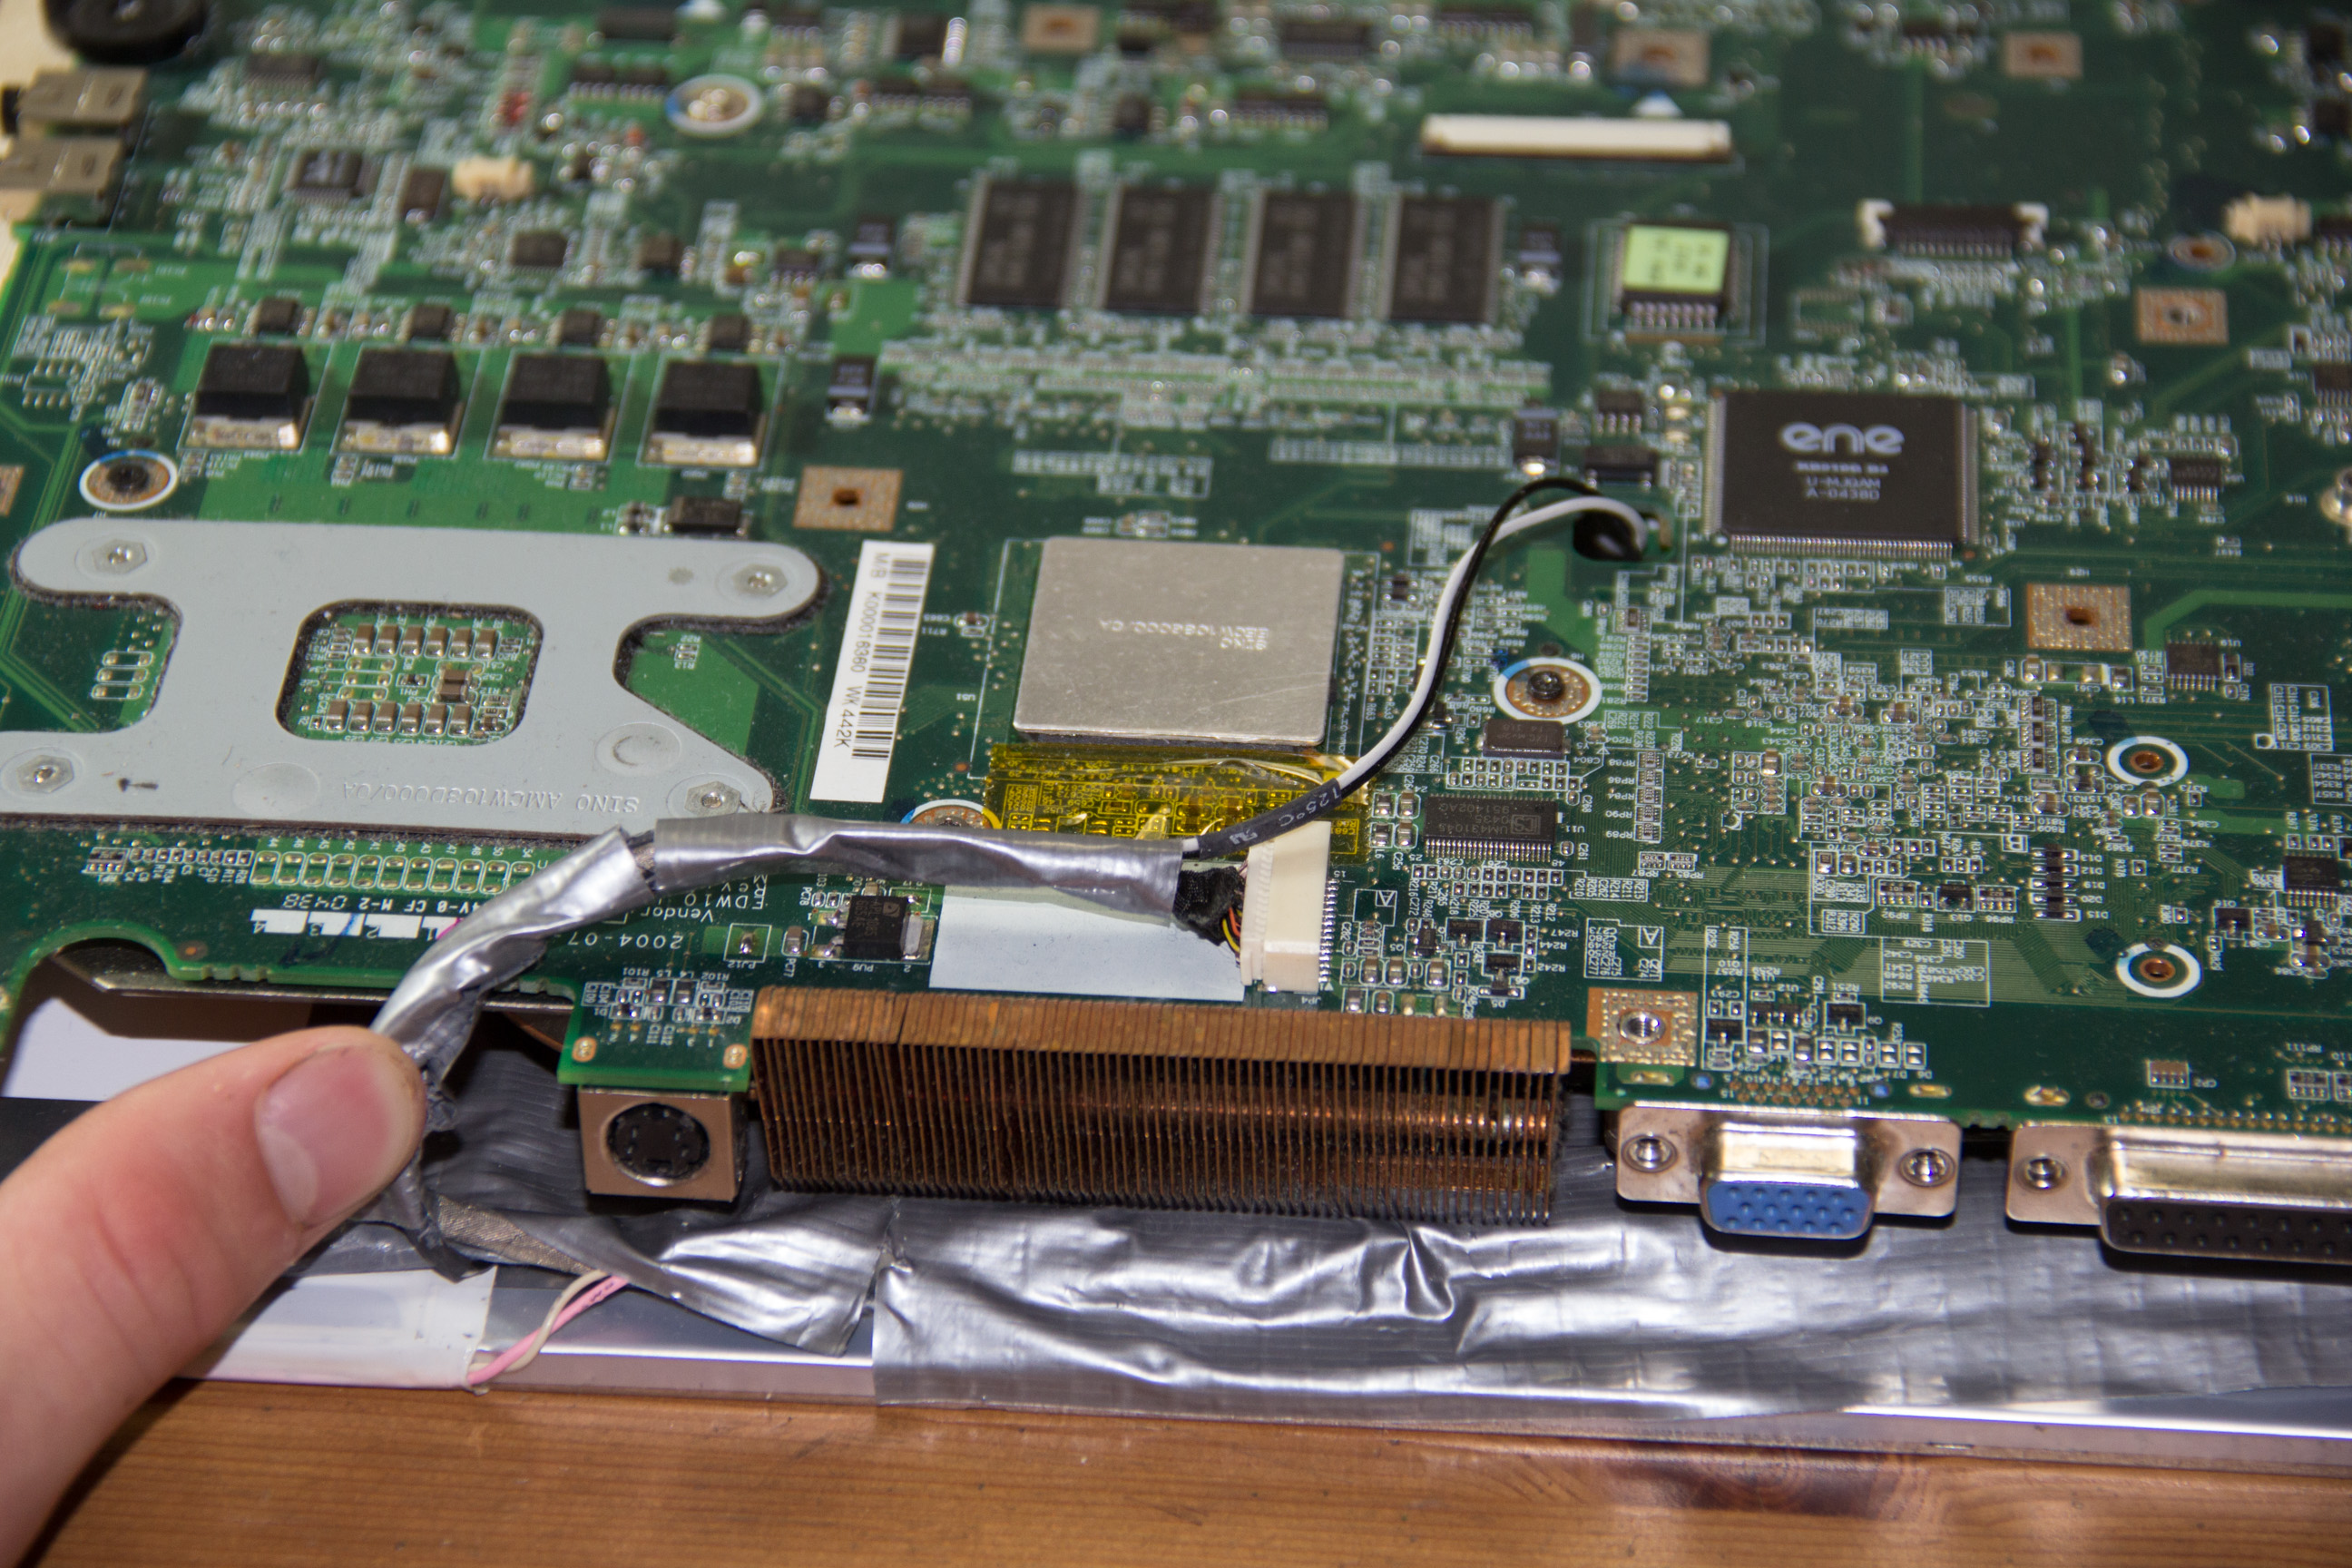
  • Taking the laptop apart should be relatively straightforward, but mounting the motherboard and components behind the screen, and the screen to the frame, will require extensive creativity.
  • Creating a finished-looking product using only repurposed parts, and laying out all the components to fit inside a restricted area, will be a challenge.
  • The following options exist for finding and/or designing a frame adequate in appearance and dimensions for the screen and components.
    • Measure the frame and prepare exact dimension specifications, and get a décor shop to custom design a frame. After investigating, it seems the cost would likely be prohibitive.
    • [décor shop custom frame design utility]
    • Ikea’s website lists a “Ribba” shadow-box frame, a deep frame which would allow the hardware to fit behind the screen. The dimensions are too large, but a mat board could solve this.
    • [Ikea ribba frame product picture and webpage]
    • A woodworking friend could custom build a frame using a very simple design, allowing for exact dimensions to fit the screen, plus an appropriate depth for all the hardware to fit.
    • With the right tools, enough time, and some wood, nails, and varnish, I could cut out my own frame exactly as needed, and design and finish it to taste.
  • The frame will have to be modified significantly in one corner for cooling, and holes carved out for ports. I intend to use my Dremel tool with a wood-cutting disk. The CPU fan is located in one corner of the board, so I would have to carve one intake and exhaust vent. Ideally an USB port and the SD card slot would line up with the frame, so that customers could plug in such devices without unmounting the frame. The DVD drive could possibly have a slot, but its 2014 so that will probably get cut.

There are many reasons why laptops are so well suited to building digital photo frames, but  they also have certain disadvantages. Hardware will be tackled first, so the following is a list of pros and cons concerning the use of laptop hardware.

Pros:

  • Laptops are meant to be portable and compact, as such both the screen and components are thin and lightweight.
  • The system is meant for general purpose business computing, which calls for a very powerful system.
  • A laptop is lathered with ports and connectivity that are requirements for a computer, but also ideal for a photo frame.
    • USB ports and an SD card slot are present around the motherboard’s perimeter for convenient photo import.
    • Once configured, integrated WiFi allows the frame to always be connected online, and thus be updated offsite.
    • integrated audio and VGA connectivity can be used to run projectors, and act as a media hub for a sound system.

[laptop port layout overhead diagram]

Although not all of these are features that the average user would take advantage of, they drastically increase the product’s potential and make it super interesting for geeks who want to go beyond its intended purpose.

Cons:

  • High end laptop hardware generates significantly more heat than purpose built frame hardware, requiring loud active cooling fans.
  • Because the frame has no buttons, it will make initial setup harder for people who are not technologically inclined.

Some of the usability issues will be addressed in software using special tools, and the complexity and versatility caused by laptop hardware allows this frame to go above and beyond what typical frames are capable of.

Software

Hardware is only half the battle. The second goal of this project is to improve drastically upon the horrendous custom firmwares typically installed on digital photo frames, and make up for some shortcomings in the hardware. The adaptability of dedicated laptop hardware combined with the versatility of available software and the possibility of programming, means that the possibilities are endless.

[terrible picture frame software interface]

The frame will most likely have no buttons, making initial configuration and photo upload problematic. All the tools are available to operate the frame remotely and button-free, and do so in a way that is both more user friendly and sophisticated than conventional frames.

Software Options

The following are some options considered in developing a user interface and a means of controlling the frame, uploading pictures, displaying a slideshow, and performing other miscellaneous tasks.

  • Hire a friend to write a custom remote slideshow software running over Windows, that would update its own picture database remotely and offer a user friendly interface.
  • Learn a graphical programming language with the express purpose of developing my own custom solution to displaying and configuring the slideshow.
  • Every tool possibly needed is included in Windows itself, so why not adapt these to our purposes, and simplify the development by avoiding writing custom code.

Required Features

Selecting the last option, the core operating system would be Windows 8.1, the latest and greatest, and would have to be cracked for the time being because investing over $100 per frame for software is impossible in my position. Basic capabilities required by the frame are as follows. [windows 8.1 screenshot]

  • Ability to seamlessly upload pictures to the frame’s hard drive, using some sort of network synchronization.
  • Have a slideshow always running and automatically keeping itself up to date from this sync folder.
  • Ability to remotely control the frame from another system on the network, or using a phone with a special application.
  • Being able to perform any actions in Windows, such as pulling up a webpage or YouTube video in a browser.
  • Some sort of maintenance such as an occasional Windows reset, scheduled shutdown and startup for the night
  • A trigger to reenable the slideshow, hiding all windows, once the computer is idle for a certain time.

Implementation Details

Through Windows alone, I have proposed solutions for ALL OF THESE.  Only initial configuration will require a USB mouse and keyboard, so that one can connect it to WIFI. After this, the frame will only require a single power cable.

  • The slideshow will simply be the Windows desktop background in timed slideshow mode, and will be sourced from a folder in which the “Select All” option has been set. In this way, any new pictures will be added to the slideshow as soon as they are uploaded. Options exist to randomize the slideshow, fade between pictures, and change the interval length.
  • [windows desktop background selection]
  • Images will be uploaded to the frame over the internet via SkyDrive to the slideshow’s source folder, which will be marked “Make Available Offline” so that the pictures are saved permanently to the hard drive. SkyDrive is integrated into windows and can be accessed via one’s Hotmail account, and on the same network LAN sync allows rapid uploading using no internet bandwidth.
  • [skydrive online interface screenshot]
  • Windows time-based Scheduled Tasks will be used to shut down and start up the computer routinely, and to hide open windows the user has opened after a certain idle period.
  • [windows scheduled task creation interface]
  • A phone can act as a remote control on steroids; the frame will be preconfigured with a Remote Touchpad server, which any phone on the local network can connect to and act as keyboard and mouse.
  • [remote touchpad android application screenshot]
  • Remote desktop for configuration or general usage purposes will be possible either through Windows RDC, or some third party solution.
  • [remote desktop interface plus session screenshot]

Using this software setup, the digital picture frame will be completely autonomous and feature complete, and should also be quite user friendly. Once initial setup is complete, the system will run continuously and be updateable and usable without ever touching it.

Once the first system is completely configured, a golden master image of the hard drive will be captured with a program such as CloneZilla, and this image will be copied to the hard drives of one frame to the next, so that each one comes with software installed out of the box.

[clonezilla screenshot]

Doing It Better #5: Ideas Lead To Innovation / Business Mantra

It has been said quite truthfully that all people, irrespective of their circumstances, brainstorm or at least conceptualize a minimum of one brilliant idea during their lifetime. Furthermore, if everyone capitalized upon their respective flashes of genius, the entire world population would be millionaires. In other words, every human being on the planet has had or will have at least one real opportunity to become rich as a company CEO, provided they have the tools and motivation required to pursue this invention. Whether or not money would maintain its apparent value in sight of incredible riches is questionable, but that is beside the point.

I have faced some skepticism and even ridicule concerning my recent purchase on eBay, and to some degree the naysayers are right. Observed strictly from a purchasing point of view, buying three old laptops at $100 a piece just to build digital picture frames as gifts for grandparents and family is flat out dumb. However, let me propose that you look at the purchase as an investment. An investment into experience, an investment into something that I enjoy doing, an investment into my engineering education and career, an investment into a potential future market product, an investment into what may realistically one day become a startup company.

Yes the product may flop, maybe the price will be prohibitive and people won’t be interested by such a complex product, and maybe the digital photo frame market is stagnant because there is no need or desire to be fulfilled whatsoever. But the greatest inventors have identified markets that were saturated by underperforming products, and miraculously succeeded in making something better. People immediately recognize the value of what this inventor brings to the market, and all of a sudden an uncertain inventor who knows nothing about business is flooded by orders that he would never have been able to anticipate. I have seen the digital photo frame market and its evident failures, yet the flipside is that there is immense potential for innovation and improvement.

Success in the competitive capitalist market mandates an attitude of perseverance and belief in your capabilities; launch a product that is clearly superior, jumpstart it with a bit of direct marketing, and the customers will do the rest of the work for you. Granted my optimism is somewhat unwarranted, but the reality of innovation is elegantly reflected by Steve Jobs’ quote: “The ones who are crazy enough to think they can change the world, are the ones who usually do.” So call me crazy, and call my faith in my own idea blinded, but many have gone before me and continue to prove you wrong.

As for my investment, sure I might never see the $300 again and be left with scraps of old laptop hardware, but the experience of prototyping, decision making and execution of business plans alone, in my opinion, is worth much more than the opportunity cost. Further, exposure to the open market is something one learns from, and will greatly enhance the chances of a future endeavor succeeding. What if my product does succeed, then my $300 is the best way pocket change was ever spent! Obviously my immediate goal is to sell and recoup my costs, plus a little profit, but return on investment includes recognition, a new market, impressing my customers, a career, my own business, and potentially limitless return on my best investment ever.

So I’ve been hit by a flash of genius, and I’m taking a chance by investing into it. I am the 1% doing what the 99% never even bothers to try, and that alone is worth gold. I see the potential, and I am testing the waters to see if I will succeed. Don’t you want to be part of this new market, and encourage me to pursue my invention to its fullest? A small investment at the beginning has the potential to be in vain, but will more likely be seen multiplying time and time again as the success grows.

Doing It Better #4: Treasure In The Mail / Unboxing The Goods

Today June 10th as I arrived from work, I found a huge package sitting unassumingly on my bed, waiting for me to slice its “eBay” branded tape with my pocket knife and to unravel the bubble wrap cushioned by a plethora of packing peanuts. Sitting inside were 3 individually wrapped Lenovo T61p’s, plus their corresponding power adapters off to the corner.

Unboxing (1 of 1)

Unboxing (1 of 5)

Shipping was scheduled for June 18th at the latest, so it essentially arrived 10 days early. Much impressed eBay seller, I must admit! Even the packaging was superb, this thing could have been tossed by UPS or FedEx employees into their trucks without inflicting any damage to the laptops!

Unboxing (2 of 5)

Unboxing (3 of 5)

These laptops are just beautiful in every way imaginable! I could tell the screens had been wiped with a wet cloth, but they were scratch-free and perfect for the job. One had a cracked corner as if it had been dropped, the second was dented on the bottom, and the third’s palmrest panel containing the touchpad was peeling off near the fingerprint reader. Obviously I bought them knowing these defects were present, but its irrelevant because the entire frame is being tossed anyways!

Unboxing (4 of 5)

I will be posting a disassembly tutorial on iFixit.com, as a sort of contribution to the community. Stay tuned for the link!

Doing It Better #3: Decision To Move Forward / Purchasing The Goods

After seeing the success of Prototype A and then butchering it, I was left in a creative lull with no more laptops to disassemble, but also with a great idea having been confirmed at least in concept. After mulling over where to take my idea next, I started brainstorming for sources of laptops and even considered buying some at a low cost. Being that my company (MicroBytes.com) only sells new laptops and are very strict about taking recycled components, that option was out of the question. However a friend of mine had told me about 2 used computer shops in Montreal (PCDepotLiquidation.com and EncanDepot.com), and I had been to both a few times; my first computer hardware purchases ever had actually been made there. Their stock is quite extensive and also completely listed on their website; matter of fact, I regularly recommend to my clients that they go there when looking for obsolete computer parts that we don’t carry. Lo and behold, they sold a relatively powerful Lenovo T60 14” laptop without battery for $79 or $91 with tax.

T60

My plan was to negotiate a bulk order to try to bring down costs, and also ask to take externally damaged but functional models off their hands at a rebate (the motherboard and screen are taken out of the case anyway, so the case’s condition is irrelevant). After a few fruitless emails inquiring about the detailed specs, I decided to look on eBay for cheaper and better suited alternatives. After obsessing over auctions for a few days, I found a lot of 3 Lenovo T61p for $275 plus ridiculous amounts of shipping from Florida (http://www.ebay.ca/itm/Lot-of-3-IBM-ThinkPad-T61p-Laptop-Core-2-Duo-2-40GHz-2GB-RAM-80GB-HDD-/231247965404). Doing the math, each unit cost roughly $125 shipped. The specs are as follows:

  • 15.6” 1920 x 1200 LCD
  • Core 2 Duo 2.4 GHz
  • 2 GB DDR2 RAM
  • 80 GB SATA HDD
  • Nvidia Quadro FX 570M

The listing also had an option to make an offer, but after 3 successively higher lowball offers having been automatically refused, eBay blocked me from making any more. Now I could either look for another listing, buy it at the advertised price, or contact the seller to negotiate. I chose the latter and offered him $240 US, which he gladly accepted. Factoring in the shipping and currency conversion, each unit came out to $106 CAD. These were significantly better in specs plus 15.4” full HD displays for only $20 more, whereas those at Encan Depot had 14.1” 1024×768 displays; for a picture frame, the screen is everything.

2014-06-14 00_03_24-LOT OF 3 IBM Thinkpad T61P Laptop Core 2 DUO 2 40GHz 2GB RAM 80GB HDD 8836092676

I also discussed with a friend the option of shipping to a US mailbox address to save about $40 on shipping and import duties, but ended up shipping to my house for both speed and convenience. I ordered the lot from eBay on June 4th at midnight, and got notified that it shipped on June 7th; the estimated delivery date is on or before June 18th. Honestly I’m so excited for it to arrive, and will be documenting the entire process from unboxing to framing. Stay tuned to my blog for this, and also expect to see a full “Lenovo T6x laptop digital photo frame tutorial”, plus a time-lapse video of the entire building process (photo and video will be shot on my Canon 60D DSLR).

732048

Doing It Better #2: Building Prototype A / Initial Success

Since all laptop components are custom-designed from the ground up to fit into an equally proprietary case design, this tutorial is only intended to be a sample template that applies roughly to any laptop. The procedure to disassemble and custom-mount any laptop will be quite different from the next, and so this is not a step-by-step article meant to be followed exactly. Be creative, you are exploring untouched territory and your brain is your best friend!

The laptop disassembled is the Toshiba A70. Its motherboard is great because it is essentially rectangular, and has screw mounting holes in each corner.

Prototype A (3 of 19)

Remove all visible screws underneath the laptop and battery, some of which also hold the keyboard in place. Gradually remove all panels, the battery, optical drive and hard drive once they become loose. Keep gently prying the top and bottom until you find every last screw.

Prototype A (7 of 19)

Once all of these components and visible screws are taken out, unplug and remove the keyboard as well, and usually a few screws and touchpad wire remain underneath the keyboard before the entire wrist assembly can come off. Once this panel comes off, the motherboard is exposed.

Prototype A (4 of 19)

Now would also be a good time to take apart the delicate display assembly. Rubber pads usually cover the screws holding the front bezel; remove these and unscrew them. The bezel is held in by clips; give it some tension and they will come undone.

The LCD panel and WIFI antennas are plugged into the motherboard; unplug these and unscrew the hinges so the display assembly comes loose. Unplug the inverter cable (found below the screen) and remove it. The display is attached to metal reinforcing beams; unscrew these and set the display free.

Unscrew the motherboard so that it can be removed. Dislodging the ports may require flexing the board somewhat. Unplug any remaining cables as you go, and ensure that all components have enough clearance to come out. You may need to remove the heatsink as well.

Prototype A (5 of 19)


Prototype A (9 of 19)

Prototype A (10 of 19)

Ripping it apart was the easy part; next my goal was to firmly mount the motherboard behind the LCD so that it would be hidden from view. Seeing that the 15” screen from the Toshiba was too small to do so, I extracted the 17” panel from the fried HP and it fit the bill perfectly. This was a terrible idea in retrospect, only after discovering that LCDs are only compatible with their respective motherboards. This screen ended up having to downscale to a skewed aspect ratio of good old 1024 x 768. Oh well. Both the WiFi and video data cables must be routed to the back of the LCD, where the video cable connects and WiFi antennas are taped.

Prototype A (1 of 19)

Prototype A (11 of 19)

This is the point where you will have to be creative. Take note of all screw holes, and examine the motherboard to see which orientation would give the thinnest package (try to keep protruding components between the LCD and PCB). Also consider wire length, and where they will be routed relative to both the board and screen. The goal is for the motherboard to be entirely hidden behind the panel, and also be securely installed with sufficient room for cooling.

Prototype A (13 of 19)

Prototype A (12 of 19)

Having worked with nothing else in my life but wood, I also decided to jigsaw and chisel 2 beams of wood, which would fit to the left and right between the LCD and motherboard. Not only would this serve to mount the board, it would also allow for great airflow to cool the notoriously hot Pentium 4 chip. I used modified screen brackets from the display assembly to mount the wood behind the screen, and wood screws through the motherboard holes to mount the board to the wood. Makeshift solution, but it worked beautifully! While doing so, I also duct-taped the display wires behind the LCD so that they would stay plugged in an be out of the way.

Prototype A (15 of 19)

Prototype A (14 of 19)

Finally I strung a wire between the 2 topmost screws, so that one could hang this frame on a nail in the wall. It needs to be firmly secured to hold the frame’s weight and also be given some slack so that it can be hung easily.

Prototype A (16 of 19)

Prototype A (18 of 19)

The finished product! All ports are still accessible from underneath the frame, the CPU heatsink vent blows air down on the bottom, and the antennas are mounted on top so that their signal is not blocked.

photo-main

I upgraded the system to Windows 7 so that I could set a desktop background slideshow. This is the basis for the “picture frame” utility, and also allows for changing the time interval for changing image.

Doing It Better #1: DIY Digital Photo Frame / How The Idea Came To Be

Over the next few weeks I will be blogging intensely about my summer technology project involving creating digital picture frames from obsolete laptops. The series is entitled “Doing it Better”, and the articles will serve as tutorials, progress updates on my work, and also the foundation of my KickStarter project. You are encouraged to contribute any amount if my project is something you find interesting and promising for the future! It will help me fund purchasing hardware and establishing the infrastructure that I need to manufacture these incredible homemade frames.

Innovating in a saturated market, dominated by fundamentally flawed products

With a hint of environmentally friendly recycling and hardcore DIY geekiness

I recently had an epiphany; Instead of buying digital photo frames that are 60% frame and 5% computer, why not build some, DIY style, that are 90% computer and 100% frame? Some years ago, I received a 7-inch Action brand digital photo frame (essentially this: http://ecx.images-amazon.com/images/I/A1x4sTBrX7S.pdf) as a birthday gift, probably my 14th or so birthday. I tend to ride the novelty wave for a good while after receiving a new electronic device, but let’s just say that in this case, I was immediately underwhelmed by its underperformance. First of all, the specs are as follows:

  • 480 x 276 resolution at 76.29 DPI
  • SD card and USB connectivity
  • Ugly black plastic photo frame
  • Relatively bulky power adapter
  • 32 MB of built-in storage, enough to store 10 JPEGs from modern cameras
  • 7 buttons behind the frame, to navigate awkward and inefficient menus
  • Custom linux-based firmware, non-customizable and non-upgradeable
  • Some single core, couple hundred MHz ARM chip, and a few MB of RAM.


My main issue with this product is that you pay some amount, let’s say $50, and get a decorative frame that works, but whose screen is of such terrible quality that it is not even worthy of amateur photos, much less images from my Canon 60D. Furthermore, one must learn to blindly use the buttons to navigate the menus in proprietary software, to perform tasks (such as copy files to internal memory ONE BY ONE) that should not even have to be done by the user at all. Plus, the hardware is so low-budget and proprietary that nothing more can be done on it then what it was made for. For a geek, that is a bummer!

Way back when I religiously followed Engadget.com and Gizmodo.com (technology news blogs), I stumbled upon an article giving the readers suggestions on how to put obsolete laptops to good use. The tutorial that struck me most concerned stripping a laptop of its LCD screen panel and motherboard plus components, and clumsily mounting these behind a conventional photo frame. Being that I had no such old laptops at the time (I’m an avid desktop guy), the information seemed intriguing yet useless to me. The advantage of using a laptop in this scenario is simplicity; laptops are meant to be portable, and as such are self-contained, very thin, have built-in WIFI, quiet fans, and only require a single cable for power.

Fast-forward a few years to the present minus a few months, and my youth group friends’ mom, whom I had offered computer help in the past (obviously knowing that I’m a geek and tinkerer), just casually gives me 3 old Pentium 4 era laptops with power adapters! After sitting on them for a while and letting them collect metaphorical dust because they were useless to me, I decided to give some away. Having a relatively large heart, I decided to give the best one (a Core 2 Duo HP) to a missionary family for whom I had offered in-house computer help throughout the years. Obviously it was much appreciated, and was used much more than it would ever have in my hands. Now left with only 2, I gave the worst one (a Pentium 4 with 512MB and surprisingly, a DVD drive) to my sister (hehe), so she could type and watch DVDs in her room.

Now there remains only one laptop in my possession, which is responsible for sparking a flash of genius and the crux of this project. This Toshiba 15 incher (this one here: http://www.cnet.com/products/toshiba-satellite-a70-75/specs/) was in the worst condition: the power button had been ripped out, the case was cracked, and panels were missing all over the place. Nevertheless, the system booted just fine and the screen was in pristine condition. I also had a deceased 17” HP given to me by a former church member, with a confirmed working LCD screen with superior 1440 x 900 resolution. The specs of the Toshiba are as follows:

  • Toshiba A70
  • 15.4” 1366 x 768 LCD
  • Pentium 4 HT 3.06 GHz
  • 512 MB DDR1 RAM
  • 80 GB IDE HDD
  • ATI Radeon 9000 IGP

prod_satA70_350x350repuestos-notebook-toshiba-satellite-a70-mother-quemado-13689-MLA3114808565_092012-O

By this point you should be reading my thoughts like a book! I decided, being unworthy of any other normal use, that this machine would undergo dissection and be transformed into what I now call Prototype A of my laptop digital picture frame concept.